
Click on any image to bring up a full size view of the screen
All descriptions are for the image directly above it.
The Ivy League Support Utility is started by double clicking on the Desktop icon or by choosing the Support Utility option from the Ivy League Software menu that is on the Programs menu.
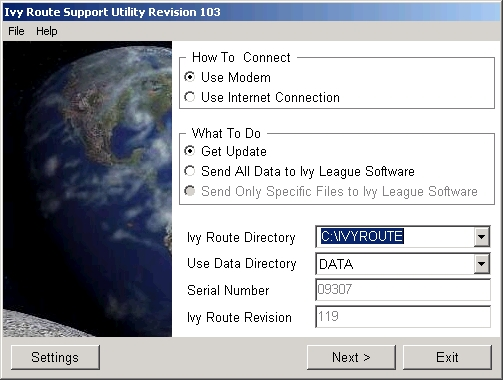
This is the Support Utility main screen..
Title Bar
The current revision level of the Support Utility is on the Title Bar.
How To Connect
Choose which method to connect with.
If connecting via Modem then you need to first set the software to use your modem using Settings button.
If connecting via an Internet Connection then you should already be hooked up to the internet BEFORE starting the Support Utility.
What To Do
Choose what actions you want to perform once connected.
Get Update will connect to the Support Server and check for Support Utility Updates, Ivy Route Updates and Private Patch files. If any are found it will download them, disconnect from the Support Server and then install them.
Send All Data to Ivy League Software will take all information that is contained in the chosen directory in Use Data Directory pull down and compress, encrypt and then send it to the Support Server. This option can be used to send data to Ivy League Software for trouble shooting or for off-site backups.
Send Only Specific files to Ivy League Software will ask for what files to send and compress, encrypt and then send it to the Support Server.
Ivy Route Directory
If you have Ivy Route installed in more than one location, ie: on your local C drive and on a network drive, use this pull down to indicate which Ivy Route you want to work with.
NOTE:Most people will only have one option in this list.
Use Data Directory
If you have more than one company in your Ivy Route system use this pull down to indicate which data directory you want to work with.
NOTE:This option is only used when sending data to the Support Server when getting an update Ivy Route always updates all data directories that are in the chosen Ivy Route Directory.
Serial Number
Shows you what the Serial Number of the Ivy Route installed in the chosen data directory.
Ivy Route Revision
Shows you what revision level the Ivy Route is that is in the chosen Ivy Route directory.
Settings button
Brings up the Settings dialog box. See next section of details.
Next > button
This is the main action button and depending on what is going on will say different things.
Exit button
This button will exit the Support Utility and return to the Windows Desktop.
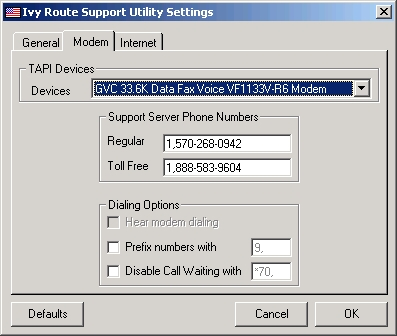
General, Modem and Internet tabs
The settings dialog has three areas. Currently we are only using the Modem one and therefore will only cover that one in this document.
TAPI Devices
This pull down will list all available TAPI Modem devices in your system...if your modem is not in this list then you need to install the correct Windows driver to support your modem. The Support Utility only supports modems that are correctly installed with Windows drivers.
Support Server Phone Numbers
Listed here are the phone numbers to contact the Support Server. Usually you will not have to change these.
Dialing Options
Prefix numbers with if this option is checked then whatever is entered in the field will be added to the beginning of any number that is dialed...this option can be used to put a 9 before the number if you are using a phone system that requires it.
Disable Call Waiting with if this option is checked then whatever is entered in the field will be dialed before any number, including above prefix option.
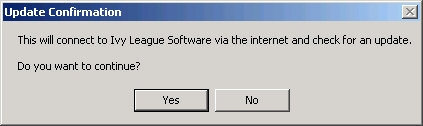
Once you have chosen Get Update and then clicked the Next button you will get this dialog box asking for verification. Click Yes to proceed with connection.

Once you click on the Next button then the right side of the Support Utility dialog box becomes a status list. As it proceeds thru connecting to the Support Server, checking for updates, receiving/sending files, etc... the information in this box will be updated.
NOTE:Once the Support Utility has downloaded any updates from the Support Server you must click on the Install button to install the downloaded updates ( as shown in the above screen dump). If you click on the Exit button then no update will be installed and you will have to go back thru the download process before getting the chance to install it.
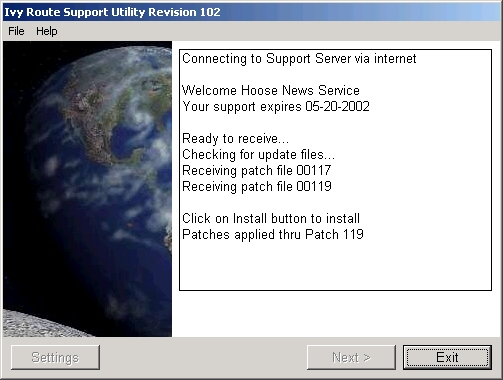
After clicking on the Install button you will see a status bar as each update is applied and once all updates are applied you will be told that the process is complete and the only option available to you will be the Exit button.
What's Next?
Once you have downloaded and installed the updates using this Support Utility all you need to do is start Ivy Route back up and it will finish the update process by changing any databases structures it needs to, rebuilding all indexes and then printing out a change log of all items that have changed since your last update.
NOTE:As always, should you have any problems or questions with/about the Support Utility, Support Server or Update process do not hesitate to give us a call or email us. See the Contact section of this web site for information on how to get a hold of us.